Wednesday, April 9, 2014

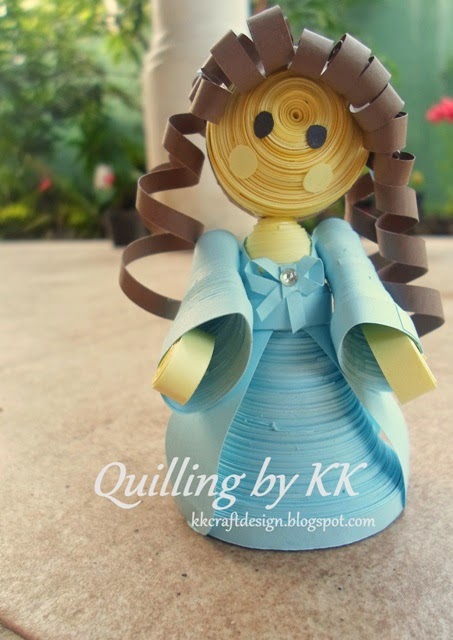
3D Quilling Doll-2

Cute Baby Doll


My cutest 2nd Doll. She is very pretty. To make her dress I used 2 simple corns.(difference Size), and some paper strips,white stone.
This is Doll made from (80mm) 2mm paper strips.She is a 7cm tall.

Some More Photos and Side views:


Happy Quilling!

Find Us On Face Book : https://www.facebook.com/KKcraftDesign

Tuesday, April 8, 2014

3D Japanese Doll

3D Japanese Doll


This is my 3rd 3D quilling Doll, and I wanted to make some thing that was Pretty So,here she is; pretty Japanese Doll.

The basic shapes that were used as are follows:


Head -  2 flat disc 'popped out' a little to make it rounded.

Body - get some 3mm paper strips and make flat disk, and then simple corn. :D


Arm sleeves:  Corns that are squashed a little so they fit to the body nicely.
Hands: grape rolls that are shushed into teardrop shapes.


this doll is made from a (80gsm) 3mm paper strips.she is a cute little 7cm tall.

Side views: 


 Happy Quilling!!


Monday, April 7, 2014

Fuchsia with Singing Bird

Fuchsia with Singing Bird


This is my new Quilling Wall Hanger Project. I used Gray background for this project.I think it's cool. ;)


I love Fuchsia so i have tried to create them to look like the real thing in this Quilled 3D flowers. I have used 80gsm A4 sheets and blue crape papers for the flowers. the stamens are created from strips as well.
 For the leaves I usesd Dark Green and Light Green 80gsm 1mm Paper strips. I used 23 leaves for this wall hanger. I love this Leave shape! :D

I drew the Bird myself and I have tried out a blending technique in order to get the deference shades  green, purple, blue,pink and sporty effects in the chest. For the tail, I used Some Easy technique. And used All body color shades. end of the tail I used One eye, like peacock feather.

I have Upload the Some Close-Up  Quilled bird Pictures to show how the blended quills enable you to get different shades.


Happy Quilling!

Find Us On Face Book : https://www.facebook.com/KKcraftDesign


Tuesday, March 25, 2014

Luxury Greeting Cards

Luxury Boxed Birth Day Card

Dazzling Luxury Birth day Card Crammed With Gold,Brown,Red, Blue and Silver tiny Dust In Sexy Blue.  Hand tied loops of satin ribbons anchored into place by a large blue coloured button - A seductive design suitable for ladies or gentlemen.

 Don't Forget to Personalize The Front Of Your Card to Make it More Special! 
This Birth Day card Beautifully presented in Luxury Black Gift Box with Blue check velveteen frame in side For Maximum Presentation. 

    
Thank You For Your Visit!

Find us On Face Book :  https://www.facebook.com/KKcraftDesign

Spiral Roses

Spiral Roses


Perhaps you've seen Spiral Paper Roses...... Start With the Circle,Cut the swirl, Roll it up Done!


Wait.......

So the How to..,

 1. Lightly draw a circle with a pencil. (I used burgundy metallic paper and traced around a bottle which was about 2.5 inches in diameter.)
 2. Cut out the circle with  scissors, using the pencil mark as a baseline.
 3. Cut into the circle in a spiral motion, going around as far as the scallop scissors will let you. Oops, I snipped off the inside of the circle. It's okay... the cut doesn't have to be perfect. :D
4. Insert the inner end of the spiral into the slot of a quilling tool and roll the paper until you reach the opposite end. Slide it off the tool. If you prefer to finger-roll, that works fine also.
5. Compress the spiral gently between your thumb and index finger... looks more rose-like now. Put a little dab of glue on the tail and hold it in place on the side of the rose while the glue dries. A quick-dry glue is ideal for metallic paper.
  End result.... a rose is a rose is a rose... <3
For your Loved Ones!

3D Pot with Flower Ball

                      3D Pot with Flower Ball

I Love this Quilling ! I made This in last month.The Materials this Quilling project are 80gsm Paper strips(2mm),Transparent Glue, a slotted Quilling tool.
To make the flower pot ,with the quilling tool, star the rolled paper strips one by one.Now you have flat paper Disk.Next Gently push center of the disk so that it extrudes outward to from the shape of the flower pot.
Apply a generous amount of the glue in side of the pot to hold the shape.Let the glue dry.
I glued in side the pot Two pieces sponge using Transparent glue. Then I Cut Little piece of Green and Brown Papers and put it in to the sponge.Let the Glue Dry. 

Rolled some Papers and bind using gum-tape. Then I get sponge and cut round shape. and I glued ball on to the roll.


Then using Some glue I added Little Tissue Flowers all around. I used Red Tissues for flowers. and middle of the flowers I used 1mm flat rolled paper strip.  
Now Its Ready!!  


Thank you For Your Visit!

Quilled Teddy Bear

Teddy Bear

A few Weeks ago, I made this cute Teddy bear.I always wanted to made teddy, finally I did it.


I got this idea through after Google search.


I used 80gsm papers. 
The Quilled teddy bear is aprox 4.5cm tail, that is about 1 1/2". He look so tiny on my palm.

Side view:


Thank You For Your visit! 


Find Us On Face Book: https://www.facebook.com/KKcraftDesign


Quilled Mouse

Quilled Mouse

   I made This In Last Week. I love this 3D quilling!


  This Little guy just 3.5cm long and 6cm tail.

  Happy Quilling!


  Find Us On Face Book  :https://www.facebook.com/KKcraftDesign

Wild Flower Frame

Wild Flowers

 This Is My 1st Design Of this Month. After Google Search  I find this Idea. :D

I started by making a Few field Flowers and I choose Poppies for blue Color.

I always wanted to Quilled Some wheat and now I had the Chance, hence  the three corn ears.


this Arrangement is not be completed  with out Fruit.So i decide to make the delicious Strawberries! But for a Chang I made Blue Strawberries. :D 


I used 2mm paper Strips of paper Hand cut from 80gsm A4 sheets from paper. For the Background I used the Black Design cardboard. Which make all my  flowers and leaves pop-out.The aproximate of this quilled Craft is 21cm x 29.7cm.


Thank You!